Thursday, December 29, 2011

Carpet Stain Remover

Oh, carpet stains. They are so much like laundry...you are never really finished with either. So when I happened to come across this article I was intrigued. Could removing carpet stains really be so simple and so cheap? Just one part ammonia, one part water, and steam the stain out?

In the past I've been a sucker for carpet sprays. Like RESOLVE for example. A 22 oz. bottle of RESOLVE costs about $4.23. Now put this into perspective. One gallon = 128 oz.
That means that one gallon of RESOLVE would cost $24.61!
Amazing.

In contrast one gallon of this homemade stain remover costs about $1.50 to make.

That's a 94% savings folks. But does it work? Well, let me show you how it worked for us. In the spring someone walked right into the house with muddy feet and left a few lovely dirt stains.

Jillee really did a great job explaining this process, so it was simple to follow.
  1. Mix one part ammonia with one part hot water. I mixed one cup of each when I tried this.
  2. Apply mixture to the stain. You DO want to give the stain a pretty good soak, so don't be too shy about wetting the stain.
  3. Place a clean white towel (I used old baby burp cloths) over top the wetted stain.
  4. Iron over the towel on the STEAM setting. This is what I saw after just ONE time ironing over the stain.
  5. Repeat the process as desired.
A couple of notes:
  • Your house will smell like ammonia for a few hours, there's no getting around it.
  • If you have shag carpet iron in BOTH directions, otherwise you will only clean one side of the carpet fibers.
  • This same process also lifted a red piece of salt water taffy that had been ground into my carpet!
  • This creates ammonia gas (because you are evaporating the liquid ammonia), so keep the windows open and be careful about how much ammonia you are ironing up at a time.
Now, let's be honest. You can still see some of the stain in the AFTER picture, right? That's because the whole carpet really does need a professional cleaning. In fact, after I finished just this spot it was obvious how dirty my carpet really is. I mean look how CLEAN the carpet is right there in the middle of the old stain!

To sum things up, this process is amazing! It will certainly come in handy for spilled drinks, potty-training accidents, muddy footprints, and sticky food that gets caught in the carpet. I'm so grateful I came across this cleaning recipe!

Tuesday, December 27, 2011

Valentine's Wreath

As far as crafting on a budget, this is one of my favorite projects completed.
How to:
1. Using wire hangers or heavy-duty wire from a hardware store, make the shape of a heart. I used 0.064" wire (14 ga.) and I doubled it to make the wreath more sturdy.
2. Using 5 yards of Tulle, cut strips that are about 2 inches by 4.5 inches.
3. Tie the strips of Tulle in knots around the entire wreath.
4. Add strips of lace, fabric, or other colors of tulle to give more dimension to the wreath.
6. Add a long strip of fabric to the wreath to use for hanging.


Cost:
  • 5 yards of Tulle: On sale at Hobby Lobby for $0.77/yard. I purchased 5 yards (total = $3.84) and used a 40% coupon making my total $2.30
  • Wire: FREE! We had some left over wire from a fencing project 2 years ago, but we also had wire hangers in the closet that I could have used.
  • Fabric Strips: FREE! I save a lot of my odds and ends when I sew, and I had just what I needed for this project.
Grand total: About $2.50 after taxes.

Wednesday, December 21, 2011

Little Girl's Felt Purse

The thing I miss most about our pre-money makeover life is all of the crafting I was able to do. There's nothing quite like brand new fabric. (Sigh). So I've been using what I already have when it's time to craft. And today I present to you the little girl's felt purse.

Here's what you need:
  • Felt Squares
  • Embroidery Floss
  • Ribbon
  • Needle
  • Scissors

 1. Choose the felt you want to use for the body of the purse. I chose a tan color. Fold the felt square until you reach the size you want the purse to be.

2. Trim the excess felt from the top, and trim the folded felt until you reach the width you would like your purse to be. I like using a folded piece of felt for the purse because in the end I only have to stitch two sides together rather than three.

3. Cut flower pieces from other colors of felt. I chose to make a modern, non-symmetrical flower. I cut one set of white petals larger than the other.

4. Position your flower on the front of your purse. Using a coordinating color of embroidery floss stitch all three flower pieces and the purse together.

When you finish you should have something like this.

5. Now you can embellish however you would like. I chose to use green embroidery floss and stitch a vine around the flower. You can free-hand it like I did, or you could use a water soluble marker and draw your design first.

6. I also added a couple of teal stars to my vine. Once you have finished the front of your purse cut two pieces of ribbon to serve as handles.

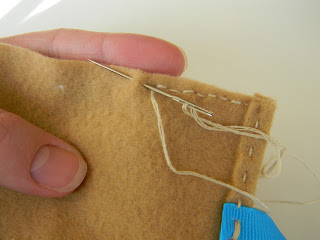
7. Turn the purse over so that the right side is facing down. Use a coordinating color embroidery floss to stitch the top 1/4 of the purse under.

8. While stitching the 1/4 inch down, add the ribbon pieces where you would like the handles to be.

When you finish the length of the top of the purse you should have something like this:

9. Fold the purse right-side-out so you can see the front of the purse. Repeat the last step with the back side of the purse as shown.

10. Fold the purse together again, right sides together, and stitch up the sides.

11. Repeat with the other side and flip right-side out. I know my little one loves this purse, and I hope someone else out there will too.


Saving on Groceries

You may not believe this, because we didn't either when we did the math, but during the early fall months we got our grocery bill down to just $120/month. This is how we did it:

1. Bountiful baskets: Every other week we spent $15 on a co-op basket of fruits and vegetables. There are several options out there if you want to do this too. We use www.bountifulbaskets.org

2. Home grown: this year we had a fairly successful garden! Our harvest included tomatos, cucumbers, carrots, squash, radishes, lettuce, peas, beans, and beets. We picked our vegetables every 3-4 days and did so many things with them! We canned them, dried them, ate them raw, steamed them, and shared them with the neighbors.

3. Food Storage: It took a long while, but we finally have the "basics" in our food storage...salt, flour, sugar, oil, yeast, baking soda, baking powder, dried noodles etc. We used that during the fall to make breads, cookies, side dishes, and desserts.

 There you have it. The combination of those three things allowed us to spend just $30/week at the grocery store. 

Sunday, October 2, 2011

Coats for Coates

Now that I've been couponing for nearly a year, I've learned a few really great tricks. The key to all of them is patience though.

For example, 2-3 times a year sales and coupons can be combined so you can get a HUGE deal by shopping for clothes at Kohl's. And that's just what we did yesterday afternoon! Now that winter is on its way, we figured that new winter coats would be a pretty big priority. So we took advantage of this:
  • Children's Coats--30%
  • Extra 15% coupon from the mail
  • $10 off purchase of $30+ coupon in the newspaper
So for our little guy we found a coat and snow pants set, normally priced $115.
The 30% off sale price made the coat set $80.50
The extra 15% brought the price down to $68.43
And the $10 off coupon left us at $58.43!

And for our baby girl we found a coat that was normally $40.
The 30% off sale price made the coat $28
The extra 15% off brought the price down to $23.80
(We purchased some new underwear for the boy here to bring the total up to $30)
And the $10 off coupon  left the final price of the coat $13.80!

So both kids now have warm winter outwear that would have normally cost $155, but we paid less than half that!

Thursday, August 11, 2011

Rededication

Dave is definitely NOT lying when he says the debt snowball is the hardest part of this process.
Even though it feels like we've made no progress since April we've still managed to pay down another $2784. It's discouraging because there was a lot more money we planned to put down.
HOWEVER, since April we've been able to pay cash for my first semester of Graduate School, a new lap top, another Truck repair, and some more food storage. Good? I guess so.
Why are we disappointed in ourselves? Well, we've also spent the summer buying new plants for the yard, eating our weight in ShaveIce, paying for swimming lessons, buying new clothes, and probably eating out more often than we should.
Lesson learned: Summer is a debt snowball killer...we really watched that snowball melt!
Here's the re-dedication. For the next few months we will be doubling our car payment (so happy to have just ONE now!) with the expectation that we'll have it payed off before the beginning of next summer...minimum. All extra money will be headed that way too.
Here we go (again).

Thursday, June 2, 2011

The Progress of Little Progress

Things in April and May were really SLOW moving for us. The money we've freed up from our old car payment (as well as the money we're saving on insurance) was eaten up by little things, like a car repair, visits to the doctor, and the kids needing new clothes.

And while it feels a little depressing to think that we're not paying things off fast enough, it was so nice to have that extra money when we needed it!

During these down times we've been trying to show ourselves what we HAVE accomplished since the beginning of our T.M.M.:


  • We have cut our monthly grocery bill from $500/month to about $275.

  • We almost never make a purchase now without a coupon (grocery, clothing, or eating out)

  • Speaking of eating out, we have cut our "fast food bill" from $200/month to about $60...could we cut more? Probably.

  • We are learning how to do a lot of things on our own (making clothes, building shelving units, shampooing the carpets, rotating the tires, etc.)

  • We've had to use the emergency fund twice, and after both times we immediately paid ourselves back.

  • We have nearly saved up all of the tuition I am going to need to start my Masters Degree this summer semester...we're still trying to figure out where the rest will come from, help the Universe send us good vibes on where to find that cash. :)

Hopefully our next post will have more progress!

Monday, May 16, 2011

Literally as cheap as dirt

A couple weeks ago we were able to do some more landscaping. This time it was literally cheap as dirt. We put in a set of stairs on the side of our rock wall. Here is the before, a big, muddy mess: And the after: With some finishing touches:

The retaining blocks were free. We got them from Evan's mom who had them sitting in her backyard for the last 7 years.

We spent $25 on a scoop of sand, and $35 on a scoop of gravel. The labor...FREE! It was a little tricky trying to take care of two kids and put in a set of stairs in just one Saturday, but we did it. The hanging baskets were each $10 and the flowers were another $30. This little Saturday project cost exactly $100.

Saturday, April 30, 2011

Using What We Got

We get Spring Fever at our house during this time of year. Last year was our first Spring in our new home and we did a lot of work in the yard (though you'd never think so just looking at it). And that work cost us a bit of cash. We had a Sprinkling system installed in the front yard, a fence put up, a playground built, garden boxes built and installed, etc.

So this Spring we're trying to do as much free landscaping as possible. We spent last weekend doing this:
Planting several starts that came from a neighbors Pussy Willow tree. Cost = $0


Laying down wood chips where we once had weeds. The wood chips came from an overgrown tree in our back yard. Cost = $0 (the wood chipper we rented ended up being free of charge!)


And we planted several irises that came from my mom's yard. And some of those came from the house where I grew up. Cost = $0

Next we hope to find a use for all of the old bricks we keep digging up in the back yard (we are pretty sure our house sits where an old masonry once was...and the bricks we keep finding are the "rejects" from the masonry.) We also have dozens of logs that we don't know what to do with!

Overall cost for some curb appeal:

FREE


Tuesday, April 19, 2011

Success at the Grocery Store

Want to know the best way to be successful at the grocery store? I use to think that it was all about making a list, then sticking to it. Wrong. That's not it at all. It certainly helps though. And it is a minor part of overall shopping success.

The key to financial success at the grocery store is...

Knowing the full price or average price of products. Really.

Do you know the average price for a pound of ground beef? What about a gallon of milk? A can of corn? What about a pound of broccoli, or a pound of apples? Do you know the best time of year to buy grapes? Do you know which months your local stores offer Case Lot Sales?

I never knew the answer to any of those, and I really didn't care. I would make a list, go shopping, and pick up those items without even looking at the price tag. Sound familiar?

So here it is, the ultimate way to be successful at the grocery store:

1. Browse your favorite store's weekly ad.
2. Make a weekly meal plan based only on items on sale. (This is an immediate 35-40% savings). You will soon learn the sale prices and regular prices for most items if you do this every week.
3. Make your grocery list.

4. Shop.

We add an extra step in between 3 and 4...Look for coupons for the items on your list (this usually saves another 10-25% depending on how much you buy and how many coupons you have). Most people think this is time consuming. No. Way. Just go to www.couponmom.com and use their "coupon database." We also love using www.gurusdeals.com which keeps a list of all sale items and available coupons for Utah grocery stores.

If anyone has any other grocery shopping tips we'd love to hear them.

Saturday, April 9, 2011

Thinking Ahead

Before we buy anything these days we ask ourselves one question:


How much could we expect to sell this item for at a yard sale in a few years?


(I'm sure there was a more grammatically correct way to phrase that...)


It's a good motivator to keep me from buying $50 outfits for my 9-month-old, extra toys for the 4-year-old, and new Target dish towels for every holiday...oh, how I miss those dish towels.

Monday, April 4, 2011

Progress

Days on our TMM: 58

Bills paid off: 3

Debt paid: $4,592

We're not sure if we should be proud or a little embarrassed. Either way, we're glad to be making progress and we want to share this information to inspire others. For the first 6 weeks it felt like we were going no where. But now things are really moving! For us it has been all about determination, perseverance, and faith.


It took a lot to get here:

Cutting our grocery bill in half

Making our own baby items (food and clothes)

Calling the cable company and downgrading

Downgrading internet access


And just plain getting organized.


We'd love to hear anyone else's ideas for saving money, and we're hoping for more progress in the next 58 days!

Monday, March 28, 2011

Oh, We ARE Serious.

I'd be lying if I said that this whole thing has been easy. In fact, it's been harder than I imagined. It's a very slow moving process...like having to push a 6-foot boulder from one end of a football field to the other, using only your bare hands. It's exhausting.


Actually, we've occasionally been so exhausted that we have taken breaks (bad, I know!). Like last weekend when I accidentally went into Hobby Lobby. CHOKE.


But today was the tipping point!


We just got back from selling our Chevy Cobalt. Yes. It looked just like this one. We just freed up a car payment + insurance payment each month AND made a small profit on the car.

The OPTIMAL thing to do would be to put the entire profit on the next bill. Instead we're going to use some of the money on maintenance for the other two cars. Even after that we will have enough to pay off another bill.


Did you wonder if we were serious about this whole thing?


We most certainly are.

Friday, March 25, 2011

That's What It's All About...

We're just a couple months into our Total Money Makeover, but we've already figured a few things out. Now remember, we're SLOW learners. There is probably nothing you will ever read here that you haven't heard somewhere else.
It's all about being organized. Duh, right? Well, we WERE organized with our money before. We knew how much was coming in and how much was going out. We had spread sheets in Excel, made grocery lists, etc.
But that's not the organization I am talking about.
We have saved an amazing amount of money by organizing our time and home!
  • By getting everyone to bed on time we're able to wake up earlier and eat breakfast. This has saved us from eating out for breakfast AND from over indulging at lunch time/snacking unnecessarily.
  • By keeping the laundry organized we keep track of all those little boy and baby girl socks. This has saved us from running to the store for another package of socks, only to look under the couch a few weeks later and find all those that were missing!
  • By packing up left-overs immediately after dinner we get tomorrow's lunch prepared. Obviously this has saved us from going out to eat for lunch.
  • By reading grocery store ads, making lists, and checking for coupons we save money at the store. In the last 2 months I have not made a single "shoot-from-the-hip" purchase at the store. You know the ones I'm talking about..."Oh those Cadbury Eggs sound so good, I'll just grab a couple bags..."
  • By regularly sorting through our closets we keep track of our bars of soap, boxes of tissues, tubes of toothpaste, etc. This has saved us from buying things we don't need.

Organization has been the key the last few months! In fact, I'm down to only two trips to the store each month. I use to go once a week and spend at least $125 each time ($500/month). Now I'm spending just $150 each trip ($300/month)...That includes diapers and formula. AMAZING!!!

Thursday, March 17, 2011

Increasing our Income

We've heard that the fastest way to increase income is to sell the belongings that you don't need.

A few weeks ago we walked into Cabelas and walked out with some cash. I attribute every bit of this success to Evan. It was his idea, his items that we sold, and his drive that has pushed us through the last few weeks.

He's the greatest!!!

Our current status: One bill has already been completely paid off and a second bill will be finished by mid-April!

Saturday, March 12, 2011

$0.44 Couch Clean Up

My kids make a HUGE mess of our couches. We knew that would be the case and that's why we chose Microfiber upholstery. And it really is true...it's easy to clean--IF you catch the spill right away. Other wise you can run a cloth over the mess, but you can almost never get it completely clean.

And then there are the smells!

We use to rent a Rug Doctor each spring to clean our upholstery, but I recently tried something new and I love it even more.

All you need is:
  • A good vacuum
  • Baking Soda--likely the only thing you need to buy! And I got mine for $0.44 the other day.
  • Water
  • A washing machine and detergent
Step 1: Vacuum all the loose dirt off your cushions and frame
Step 2: Unzip the cusion covers and remove them. (Our seat cushions are foam, but our back cushions are filled with stuffing, so we used garbage bags to hold the stuffing while we cleaned).
Step 3: Throw your cushion covers into the washing machine (first make sure the dye in your fabric won't run). This is suppose to work for all microfiber material.

Step 4: While your upholstery is in the washing machine, use a damp cloth to clean the parts of your frame that can't go into the washing machine.
Step 5: Make sure that the couch is still damp...take a handful of baking soda and rub it all over the damp part of the couch.
Step 6: Trust me on this. Make a huge mess! Rub the baking soda into the fabric. It should make a flaky paste.
Step 7: Walk away. Leave the couch alone until the baking soda dries. We let ours sit overnight.

Step 8: While the soda is drying remove the upholstery from the washing machine and let it air dry. We like to use our dining room chairs for this.
Step 9: Vacuum the baking soda up, put the cushions back together, and reassemble your couch.
Step 10: Enjoy an odor-free, soft, and clean place to sit!

Sunday, March 6, 2011

How Do You Solve a Problem...

Baby girl needed a new dress for Church. We are finding that she is about as wide as a 12-month-old, but as short as a 6-month-old, so finding clothes that fit is becoming difficult (and expensive).
I have yards, and yards, and yards of fabric in the basement that my Mother-In-Law has passed on to me over the years. So I tried my hand at making a dress on my own:I know what you're thinking..."that skirt looks a lot like drapes." Well, we THINK that's what the fabric was originally used for. So, yeah. I'm pretty much a modern day Maria Von Trapp.

Cost of this dress: FREE! (Unless you count the time it took to measure, cut, sew, re-sew, pick seams, sew again...if you counted THAT, then this would be a VERY expensive dress :) )